2025/01/25 update
Page Contents
Updater Banner

The Updater banner displays at the top of the Access screen area (just below the tools ribbon).
Hover a button to display the URL link which opens in a new browser tab.
Help Link button opens this page.
Office Tasks button opens the Task-Group page (which contains a link-list to FMAATC task documentation).
Business Date Window
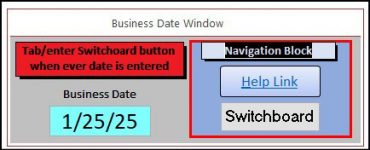
When FMAATC Membership Updater (Updater) is started the Business Date window is displayed.
This window opens in the center of the Access screen with the tab stop at the Navigation Block.
If renewals and/or new members are not being processed, simply tab-to the Switchboard button and press-enter. This opens the Switchboard window.
Otherwise, tab to the date field and enter the business date to be worked on. Then tab to the Switchboard button and press enter to open the Switchboard window. The date is propagated onto the Add, Update, and Report windows.
Because the Business Date window is referenced by the Add, Update, and Report windows it remains open until Updater is closed.
The blue “Navigation Block” has the following navigation buttons (right side of window):
Help-Link button – links to this web page/link (https://d.fmaatc.org/home/membership-updater-help/#bw). The page opens in a new browser tab. The Updater remains open.
Switchboard button – opens the Switchboard window.
Switchboard Window
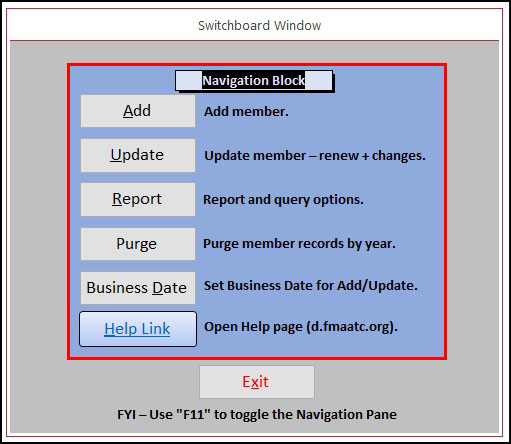
The Switchboard window is opened via the Switchboard button on the Business Date, Update, Report, Add, or Purge windows.
The Switchboard window allows navigating to all other windows of Updater. Switchboard closes when any button is clicked (or tab/enter is used).
Help Link button – links to this web page/link (https://d.fmaatc.org/home/membership-updater-help/#sw). The page opens in a new browser tab. The Updater remains open.
Exit button – Updater is closed via this button. Also, Updater is closed via the close icon (upper right X icon) while on any window.
Add Window

Overview
The “Add Window” is opened by clicking the Add button on the Switchboard, Update, or Report windows. It is used to enter new member information (including their truck information).
The business date (entered in the Business Date window) is propagated into the Start-Date and Renewal-Date fields. The field with “If Start-Date is Correct…” is the first selected field. Before entering any information, verify this date is correct as the first action. If wrong, click Switchboard > Business Date buttons to allow the date to be corrected (refer to Business Date window).
If there is a donation from the new member, then the Donation-Date must be entered equal to the Start-Date.
Clicking the “? ID Format” field opens a dialog defining format information for the ID field. More details are at ID details.
The Truck-Descriptions button (lower left) provides a report list of names which have been used for trucks. The report list is based on the truck-class entered in the field to the left of the button. This aids in entering the Truck Description column when adding a new truck. Click the close X icon when finished reviewing the report.
After the new member information is entered, the Finish Add Block is used. The ID is copied and the Update button clicked. The copied ID will be used to find the new member in the Update window.
If all fields are valid, the Add window is closed and the Update window is opened to finish payment recording and sending the member an email.
Note: Any field which has any information entered and then deleted or eliminated by ctrl+z or eliminated by backspace is an ENTERED FIELD and will cause field validation to occur (starting with the Name field).
If any field is in error, an error dialog is displayed which must be resolved (each field error gets an error dialog displayed). Example-Error links to a PDF with screenshots of errors.
To escape from an Add window with error dialog displaying:
> click OK in the error dialog
> click the Update or Switchboard button
> click OK in the reappearing error dialog
> click Yes in the “You can’t save….” dialog
The Update or Switchboard window will display.
The blue “Navigation Block” has the following navigation buttons (right side of window):
Help-Link button – links to this page on https://d.fmaatc.org/home/membership-updater-help/#aw The page opens in a new tab. The Updater remains open.
Switchboard button – saves/closes the Add window and opens the Switchboard window. If any member information had been entered, all fields are validated. Consequently, error dialogs may be displayed.
ID Details
US member adds require the following:
ID – formatted as STCLLLL9 – lower case characters will be converted to upper case.
ST = State
C = City (first character)
LLLL = first four of last name
9 = unique qualifier (if there are multiple members with the same ID, each is assigned a separate number – 9, 8, 7…..)
Canadian member adds require the following:
ID – formatted as XPRLLLL9 – lower case characters will be converted to upper case.
X = constant for Canadian
PR = Provence
LLLL = first four of last name
9 = unique qualifier (if there are multiple members with the same ID, each is assigned a separate number – 9, 8, 7…..)
Provence, Postal Code and Country Information – entered in the following fields:
State = Provence
Zip = Canadian Postal Code (six characters)
Country = Canada
Foreign member adds require the following:
ID – formatted as ZCOLLLL9 – lower case characters will be converted to upper case.
Z = constant for Foreign
CO = Country (first two characters)
LLLL = first four of last name
9 = unique qualifier (if there are multiple members with the same ID, each is assigned a separate number – 9, 8, 7…..)
Postal Code and Country Information – entered in the following fields:
Zip = foreign Postal Code (as provided by the member)
Country = as provided by member
Update Window
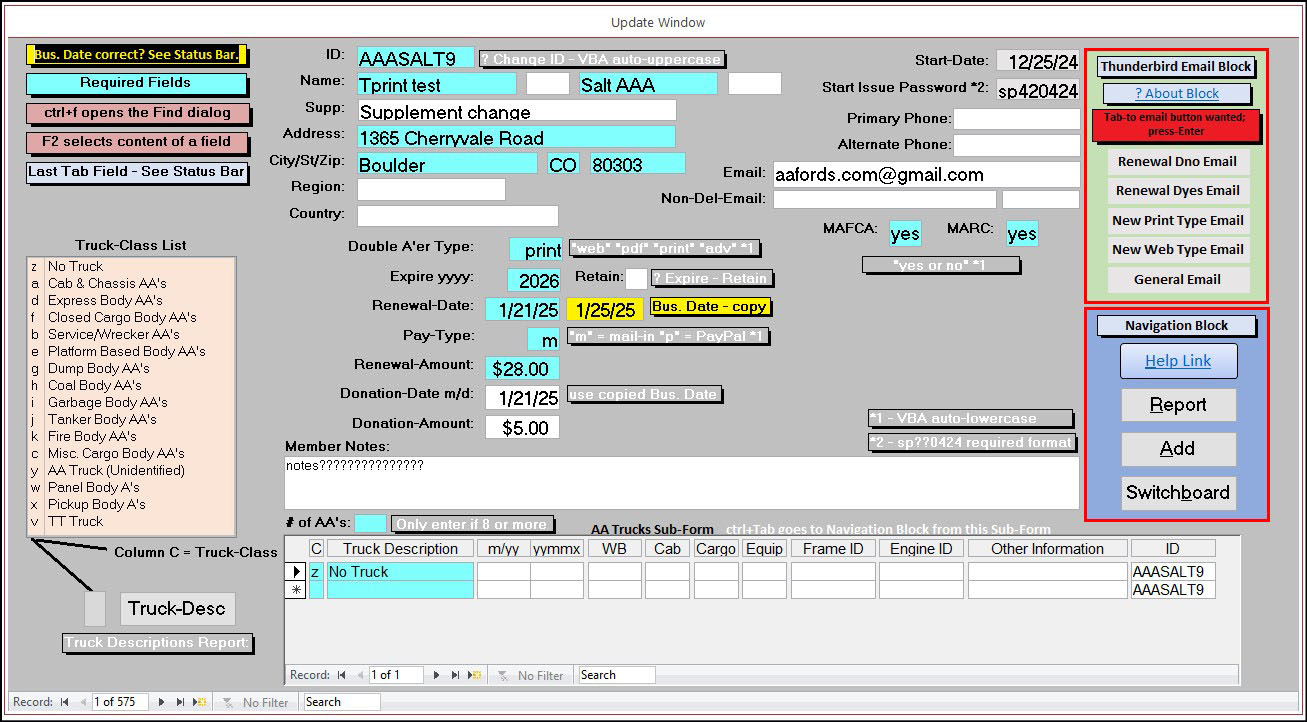
The Update window is opened by clicking the Update button on the Switchboard, Add, or Report windows. The Update window is used to change any member’s information (including their truck information).
When the Update window is opened via the Switchboard window, the focus is at the “Bus. Date correct?…” field (upper/left). If the date (right of Renewal-Date) is incorrect, click Switchboard > on Switchboard > click Business Date (allows for business date correction).
When the Update window opens from any window (except the Switchboard window), the focus is on the last name field and the “Find…” dialog opens with the current last name in the “Find What” field. Use this dialog to find a club member (ctrl+f also open the dialog).
The member ID is to be updated when the State, City, and/or last name is changed. Clicking the “? Change ID” field provides a dialog with format information. The ID makeup details are found at ID Details.
FYI – After tabbing/leaving a changed ID, the member’s AA Trucks table is changed to blank. Saving (ctrl+s) the member re-populates the AA Trucks table with the new ID.
Clicking the “? Expire – Retainer” field provides dialog information related to retaining an expired member.
Right of the Renewal-Date field is the Bus. Date (propagated from the Business Date window). Tabbing goes to the Bus. Date to be copied. Tabbing then goes to the Renewal-Date so that the date can be pasted. This prevents keying errors to make balancing $’s of a business date easier.
The Truck-Descriptions button (lower left) provides a report list of names which have been used for trucks. The report list is based on the truck-class entered in the field to the left of the button. This aids in entering the Truck Description column when adding a new truck. Click the close X icon when finished reviewing the report.
The green “Thunderbird Email Block” (upper-right) is used after entering member renewal information, new member information, or other information changes. Actions are as follows:
1 – At Thunderbird > insure folder fmaatc.org@gmail.com > Inbox is selected (the “Copy message to:” field is then correct when any Write email is created (insures the From: address is correct, insures email signature is correct, and eliminates misfiled email).
2 – Tab-to/enter (or double-click) the desired write email button. There are five buttons. Each button runs VBA code which saves the Update window and uses Thunderbird as the mail client in creating a “Write: TE10 – …. – Thunderbird” dialog.
3 – Complete email (if needed) and send. Note that the General Email button will require adding text.
When the desired write email button is clicked (action 2 above), a “Write: TE10 – …. – Thunderbird” dialog is created with an attached “Snapshot.pdf” file. The write dialog has the following:
From = fmaatc.org@gmail.com (required). If not, the drop-down is used to select this email address. If a correction is made, the email signature will likely need correcting also.
To = member’s email address (propagated via VBA code)
Subject = TE10 – …. (propagated via VBA code)
Copy message to: = “Inbox on fmaatc.org@gmail.com” or use drop-down to select it. This field is a result of the Thunderbird extension “Copy message to”).
Body text = propagated via VBA code. This can be changed before sending if desired. Note – the signature is as per the Thunderbird account settings.
Click Send – A copy of the email is saved in the Thunderbird account folder fmaatc.org@gmail.com > Inbox > TE-payments > TE10-snapshot.
FYI – A filter puts the email copy in this folder based on the email subject containing “TE10”.
The blue “Navigation Block” has the following navigation buttons (right side of window):
Help-Link button – links to this web page/link (https://d.fmaatc.org/home/membership-updater-help/#uw). The page opens in a new browser tab. The Updater remains open.
Report button – opens the Report window. The Update window is saved/closed.
Add button – opens the Add window. The Update window is saved/closed.
Switchboard button – saves/closes the Update window and opens the Switchboard window.
Report Window
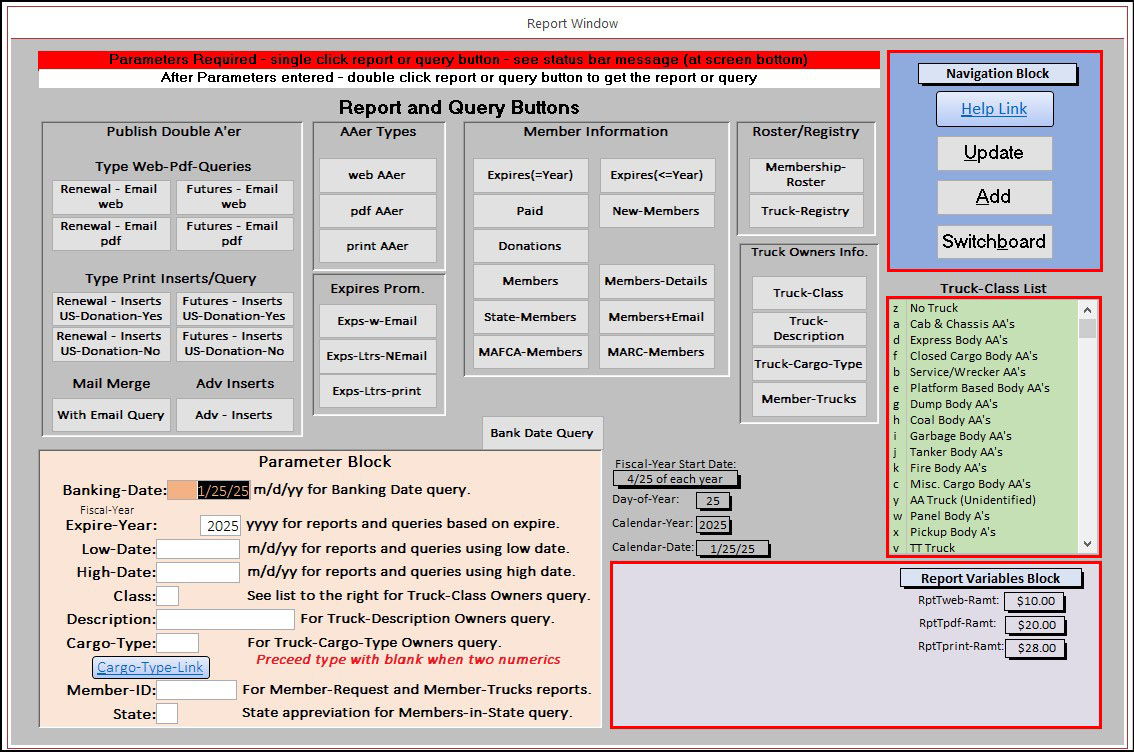
The Report window is opened by clicking the Report button on the Switchboard, Add, or Update windows. It is used to run reports and queries.
The Report and Query Buttons are at the top-left-center of the window. All buttons require parameters to be entered. Each button can be single-clicked to see the parameter requirements shown in the status bar (at the bottom of the window).
Example, a single-click of the “Renewal – Inserts US-Donation-No” button results in a status bar of – “Create Renewal Inserts for US, AAerType-print, Ddate Is Null or <= Low-Date, Expire = Expire-Year.“
Parameter fields are in an orange Parameters Block at the lower-left of the window. Each field has text regarding the input format and usage.
Once parameters are entered, the report/query button is double clicked and the report/query is created.
The blue “Navigation Block” has the following navigation buttons (right side of window):
Help-Link button – links to this page (https://d.fmaatc.org/home/membership-updater-help/#rw). The page opens in a new browser tab. The Updater remains open.
Update button – opens the Update window. The Report window closes.
Add button – opens the Add window. The Report window closes.
Switchboard button – closes the Report window and opens the Switchboard window.
Purge Window
Backup the rnn-membership.accbd file before purging records!!!!!!!!!!!!!!!
Purging expires is scheduled to be done 4/30 – information at TH50-Dead-Expire page.
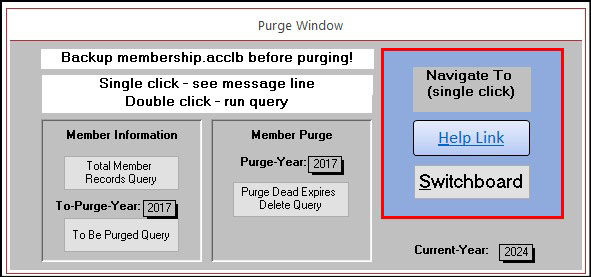
The Purge window is opened by clicking the Purge button on the Switchboard window. It allows dead-expires to be purged from the rnn-membership.aacdb file via the “Purge Dead Expires Delete Query” button.
Dead-expires are members with an expire <= -7 years from the “Current-Year”. Both the “To-Purge-Year” and “Purge-Year” fields are set to -7 years from the “Current-Year” and cannot be changed.
The blue “Navigation Block” has the following navigation buttons (right side of window):
Help-Link button – links to this page (https://d.fmaatc.org/home/membership-updater-help/#pw). The page opens in a new browser tab. The Updater remains open.
Switchboard button – closes the Purge window and opens the Switchboard window.